集群信息
1. kubernetes集群规划
| 主机IP | 主机名 | 主机配置 | 角色 |
|---|---|---|---|
| 192.168.202.129 | k8s-master01 | 4C/6G | 管理节点 |
| 192.168.202.132 | k8s-slave01 | 4C/6G | 工作节点 |
| 192.168.202.135 | k8s-slave02 | 4C/6G | 工作节点 |
| 192.168.202.136 | k8s-slave03 | 4C/6G | 工作节点 |
集群环境搭建
1. 设置hosts解析
操作节点:所有节点(k8s-master,k8s-slave)均需执行
- 修改hostname
hostname必须只能包含小写字母、数字、”,”、”-“,且开头结尾必须是小写字母或数字
# 在master01节点
$ hostnamectl set-hostname k8s-master01 #设置master01节点的hostname

# 在slave01节点
$ hostnamectl set-hostname k8s-slave01 #设置slave01节点的hostname

# 在slave02节点
$ hostnamectl set-hostname k8s-slave02 #设置slave02节点的hostname

# 在slave03节点
$ hostnamectl set-hostname k8s-slave03 #设置slave03节点的hostname- 添加hosts解析
$ cat >>/etc/hosts<<EOF
192.168.202.129 k8s-master01
192.168.202.132 k8s-slave01
192.168.202.135 k8s-slave02
192.168.202.136 k8s-slave03
EOF
2. 调整系统配置
操作节点: 所有的master和slave节点(k8s-master,k8s-slave)需要执行
- 设置iptables
iptables -P FORWARD ACCEPT- 关闭swap
# 临时关闭(立即生效,重启后恢复)
swapoff -a
# 防止开机自动挂载 swap 分区
sed -i '/ swap / s/^\(.*\)$/#\1/g' /etc/fstab- 关闭防火墙
root@k8s-master01:~# systemctl status ufw
● ufw.service - Uncomplicated firewall
     Loaded: loaded (/lib/systemd/system/ufw.service; enabled; vendor preset: enabled)
     Active: active (exited) since Wed 2025-09-24 09:24:25 UTC; 7h ago
       Docs: man:ufw(8)
    Process: 699 ExecStart=/lib/ufw/ufw-init start quiet (code=exited, status=0/SUCCESS)
   Main PID: 699 (code=exited, status=0/SUCCESS)
        CPU: 1ms

Sep 24 09:24:25 k8s-master01 systemd[1]: Starting Uncomplicated firewall...
Sep 24 09:24:25 k8s-master01 systemd[1]: Finished Uncomplicated firewall.
root@k8s-master01:~# systemctl stop ufw && systemctl disable ufw- 时钟同步
# 以 root 用户运行以下命令可以修改当前时区,如修改为上海
timedatectl set-timezone Asia/Shanghai
# 显示当前时区
timedatectl show
Timezone=Asia/Shanghai

#2、确保服务器时间与北京时间同步
apt upgrade -y
apt install chrony -y
vi /etc/chrony/chrony.conf
server ntp.aliyun.com minpoll 4 maxpoll 10 iburst
server ntp1.aliyun.com minpoll 4 maxpoll 10 iburst
systemctl enable chrony.service && systemctl restart chrony.service
systemctl status chrony.service- 配置ulimt
[root@localhost ~]# ulimit -SHn 65535
[root@localhost ~]# vi /etc/security/limits.conf
root soft nofile 65535
root hard nofile 65535
* soft nofile 65535
* hard nofile 65535
root soft nproc 65535
root hard nproc 65535
* soft nproc 65535
* hard nproc 65535- 修改内核参数
cat <<EOF | tee /etc/modules-load.d/k8s.conf
overlay
br_netfilter
EOF
modprobe overlay && modprobe br_netfilter
# 通过运行以下指令确认br_netfilter和overlay模块被加载
lsmod | grep br_netfilter
lsmod | grep overlay

cat <<EOF | tee /etc/sysctl.d/k8s.conf
net.bridge.bridge-nf-call-iptables  = 1
net.bridge.bridge-nf-call-ip6tables = 1
net.ipv4.ip_forward                 = 1
EOF
sysctl --system- 启用IPVS模式
# *安装IPVS工具以及依赖
apt update
apt install ipvsadm ipset sysstat conntrack ebtables ethtool socat -y

cat > /etc/profile.d/ipvs.modules <<EOF
#!/bin/bash
modprobe -- ip_vs
modprobe -- ip_vs_rr
modprobe -- ip_vs_wrr
modprobe -- ip_vs_sh
modprobe -- nf_conntrack
EOF
chmod 755 /etc/profile.d/ipvs.modules && bash /etc/profile.d/ipvs.modules
lsmod | grep -e ip_vs -e nf_conntrack
3. 部署containerd容器引擎
操作节点: 所有的master和slave节点(k8s-master,k8s-slave)需要执行
- 下载并安装软件包
root@k8s-master01:/usr/local/mysoft# wget https://github.com/containerd/containerd/releases/download/v1.7.28/cri-containerd-cni-1.7.28-linux-amd64.tar.gz
root@k8s-slave01:/usr/local/mysoft# wget https://github.com/containerd/containerd/releases/download/v1.7.28/cri-containerd-cni-1.7.28-linux-amd64.tar.gz
root@k8s-slave02:/usr/local/mysoft# wget https://github.com/containerd/containerd/releases/download/v1.7.28/cri-containerd-cni-1.7.28-linux-amd64.tar.gz
root@k8s-slave03:/usr/local/mysoft# wget https://github.com/containerd/containerd/releases/download/v1.7.28/cri-containerd-cni-1.7.28-linux-amd64.tar.gz
root@k8s-master01:/usr/local/mysoft# du -sh cri-containerd-cni-1.7.28-linux-amd64.tar.gz
153M    cri-containerd-cni-1.7.28-linux-amd64.tar.gz

root@k8s-master01:/usr/local/mysoft# tar axf cri-containerd-cni-1.7.28-linux-amd64.tar.gz -C /
root@k8s-slave01:/usr/local/mysoft# tar axf cri-containerd-cni-1.7.28-linux-amd64.tar.gz -C /
root@k8s-slave02:/usr/local/mysoft# tar axf cri-containerd-cni-1.7.28-linux-amd64.tar.gz -C /
root@k8s-slave03:/usr/local/mysoft# tar axf cri-containerd-cni-1.7.28-linux-amd64.tar.gz -C /- 验证
root@k8s-master01:/opt/cni/bin# containerd --version
containerd github.com/containerd/containerd v1.7.28 b98a3aace656320842a23f4a392a33f46af97866
root@k8s-slave01:/usr/local/mysoft# containerd --version
containerd github.com/containerd/containerd v1.7.28 b98a3aace656320842a23f4a392a33f46af9786
root@k8s-slave02:/usr/local/mysoft# containerd --version
containerd github.com/containerd/containerd v1.7.28 b98a3aace656320842a23f4a392a33f46af97866
root@k8s-slave03:/usr/local/mysoft# containerd --version
containerd github.com/containerd/containerd v1.7.28 b98a3aace656320842a23f4a392a33f46af97866
4. 配置containerd
操作节点: 所有的master和slave节点(k8s-master,k8s-slave)需要执行
- 生成默认配置
root@k8s-master01:/opt/cni/bin# mkdir -p /etc/containerd && containerd config default > /etc/containerd/config.toml
root@k8s-slave01:/usr/local/mysoft# mkdir -p /etc/containerd && containerd config default > /etc/containerd/config.toml
root@k8s-slave02:/usr/local/mysoft# mkdir -p /etc/containerd && containerd config default > /etc/containerd/config.toml
root@k8s-slave03:/usr/local/mysoft# mkdir -p /etc/containerd && containerd config default > /etc/containerd/config.toml- 修改配置
# 编辑 `/etc/containerd/config.toml`,确认 `SystemdCgroup = true`(保证和 kubelet 一致)
# 大概在139行位置修改 SystemdCgroup 值为 true
     [plugins."io.containerd.grpc.v1.cri".containerd.runtimes]

        [plugins."io.containerd.grpc.v1.cri".containerd.runtimes.runc]
          base_runtime_spec = ""
          cni_conf_dir = ""
        ......
          [plugins."io.containerd.grpc.v1.cri".containerd.runtimes.runc.options]
            BinaryName = ""
            CriuImagePath = ""
            ......
            NoPivotRoot = false
            Root = ""
            ShimCgroup = ""
            #SystemdCgroup = false
            SystemdCgroup = true
            ......

# 大概在67行位置修改 sandbox_image 值为 registry.aliyuncs.com/google_containers/pause:3.10
root@k8s-slave02:~# vi /etc/containerd/config.toml
 [plugins."io.containerd.grpc.v1.cri"]
    cdi_spec_dirs = ["/etc/cdi", "/var/run/cdi"]
    device_ownership_from_security_context = false
......
    restrict_oom_score_adj = false
#    sandbox_image = "registry.k8s.io/pause:3.8"
    sandbox_image = "registry.aliyuncs.com/google_containers/pause:3.10"
    selinux_category_range = 1024
......

- 修改网络插件CNI配置文件
root@k8s-master01:~# vi /etc/cni/net.d/10-containerd-net.conflist
{
  "cniVersion": "1.0.0",
  "name": "containerd-net",
  "plugins": [
    {
      "type": "bridge",
      "bridge": "cni0",
      "isGateway": true,
      "ipMasq": true,
      "promiscMode": true,
      "ipam": {
        "type": "host-local",
        "ranges": [
          [{
            "subnet": "10.244.0.0/16"
          }]
        ],
        "routes": [
          { "dst": "0.0.0.0/0" },
          { "dst": "::/0" }
        ]
      }
    },
    {
      "type": "portmap",
      "capabilities": {"portMappings": true}
    }
  ]
}

其他几个节点也按此修改- 重启containerd服务并设置开启自启
systemctl daemon-reload && systemctl restart containerd && systemctl enable containerd
systemctl status containerd
5. 部署Kubernetes
- 安装kubeadm、kubelet和kubectl
操作节点: 所有的master和slave节点(k8s-master,k8s-slave) 需要执行
# 下载用于 Kubernetes 软件包仓库的公共签名密钥
curl -fsSL https://pkgs.k8s.io/core:/stable:/v1.33/deb/Release.key | sudo gpg --dearmor -o /etc/apt/keyrings/kubernetes-apt-keyring.gpg

# 添加 Kubernetes apt 仓库
echo 'deb [signed-by=/etc/apt/keyrings/kubernetes-apt-keyring.gpg] https://mirrors.aliyun.com/kubernetes-new/core/stable/v1.33/deb/ /' | sudo tee /etc/apt/sources.list.d/kubernetes.list

# 安装 kubeadm, kubelet 和 kubectl
sudo apt-get install -y kubeadm=1.33.0-1.1 kubelet=1.33.0-1.1 kubectl=1.33.0-1.1
root@k8s-master01:/etc/apt/sources.list.d# sudo apt-get install -y kubelet=1.33.0-1.1 kubeadm=1.33.0-1.1 kubectl=1.33.0-1.1
Reading package lists... Done
Building dependency tree... Done
Reading state information... Done
The following additional packages will be installed:
  cri-tools kubernetes-cni
The following NEW packages will be installed:
  cri-tools kubeadm kubectl kubelet kubernetes-cni
0 upgraded, 5 newly installed, 0 to remove and 10 not upgraded.
Need to get 95.4 MB of archives.
After this operation, 351 MB of additional disk space will be used.
Get:1 https://mirrors.aliyun.com/kubernetes-new/core/stable/v1.33/deb  cri-tools 1.33.0-1.1 [17.3 MB]
Get:2 https://mirrors.aliyun.com/kubernetes-new/core/stable/v1.33/deb  kubeadm 1.33.0-1.1 [12.7 MB]                           Get:3 https://mirrors.aliyun.com/kubernetes-new/core/stable/v1.33/deb  kubectl 1.33.0-1.1 [11.7 MB]                           Get:4 https://mirrors.aliyun.com/kubernetes-new/core/stable/v1.33/deb  kubernetes-cni 1.6.0-1.1 [37.8 MB]                     Get:5 https://mirrors.aliyun.com/kubernetes-new/core/stable/v1.33/deb  kubelet 1.33.0-1.1 [15.9 MB]                           Fetched 95.4 MB in 18s (5,299 kB/s)
......- 初始化配置文件
操作节点: 只在master节点(k8s-master)执行
root@k8s-master01:/usr/local/mysoft# kubeadm config print init-defaults > kubeadm-config.yaml

# 查看需要使用的镜像列表,若无问题,将得到如下列表
root@k8s-master01:/usr/local/mysoft# kubeadm config images list --config kubeadm-config.yaml
registry.aliyuncs.com/google_containers/kube-apiserver:v1.33.0
registry.aliyuncs.com/google_containers/kube-controller-manager:v1.33.0
registry.aliyuncs.com/google_containers/kube-scheduler:v1.33.0
registry.aliyuncs.com/google_containers/kube-proxy:v1.33.0
registry.aliyuncs.com/google_containers/coredns:v1.12.0
registry.aliyuncs.com/google_containers/pause:3.10
registry.aliyuncs.com/google_containers/etcd:3.5.21-0- 配置主节点
操作节点:只在master节点(k8s-master01)执行
使用kubeadm初始化主节点
root@k8s-master01:/usr/local/mysoft# kubeadm init --config kubeadm-config.yaml
[init] Using Kubernetes version: v1.33.0
[preflight] Running pre-flight checks
[preflight] Pulling images required for setting up a Kubernetes cluster
[preflight] This might take a minute or two, depending on the speed of your internet connection
[preflight] You can also perform this action beforehand using 'kubeadm config images pull'
[certs] Using certificateDir folder "/etc/kubernetes/pki"
[certs] Generating "ca" certificate and key
[certs] Generating "apiserver" certificate and key
[certs] apiserver serving cert is signed for DNS names [k8s-master01 kubernetes kubernetes.default kubernetes.default.svc kubernetes.default.svc.cluster.local] and IPs [10.96.0.1 192.168.202.129]
[certs] Generating "apiserver-kubelet-client" certificate and key
[certs] Generating "front-proxy-ca" certificate and key
[certs] Generating "front-proxy-client" certificate and key
[certs] Generating "etcd/ca" certificate and key
[certs] Generating "etcd/server" certificate and key
[certs] etcd/server serving cert is signed for DNS names [k8s-master01 localhost] and IPs [192.168.202.129 127.0.0.1 ::1]
[certs] Generating "etcd/peer" certificate and key
[certs] etcd/peer serving cert is signed for DNS names [k8s-master01 localhost] and IPs [192.168.202.129 127.0.0.1 ::1]
[certs] Generating "etcd/healthcheck-client" certificate and key
[certs] Generating "apiserver-etcd-client" certificate and key
[certs] Generating "sa" key and public key
......
若初始化成功后,最后会提示如下信息:
......
Your Kubernetes control-plane has initialized successfully!

To start using your cluster, you need to run the following as a regular user:

  mkdir -p $HOME/.kube
  sudo cp -i /etc/kubernetes/admin.conf $HOME/.kube/config
  sudo chown $(id -u):$(id -g) $HOME/.kube/config

Alternatively, if you are the root user, you can run:

  export KUBECONFIG=/etc/kubernetes/admin.conf

You should now deploy a pod network to the cluster.
Run "kubectl apply -f [podnetwork].yaml" with one of the options listed at:
  https://kubernetes.io/docs/concepts/cluster-administration/addons/

Then you can join any number of worker nodes by running the following on each as root:

kubeadm join 192.168.202.129:6443 --token abcdef.0123456789abcdef \
--discovery-token-ca-cert-hash sha256:xxxxxxxxxx4d55338xxxx2e4exxxxx5b77d1xxxx476e7f4163dcxxxxxxxd7xxx - 配置kubectl客户端认证
mkdir -p $HOME/.kube
sudo cp -i /etc/kubernetes/admin.conf $HOME/.kube/config
sudo chown $(id -u):$(id -g) $HOME/.kube/config- 添加slave节点到集群中
操作节点:所有的slave节点(k8s-slave)需要执行
kubeadm join 192.168.202.129:6443 --token abcdef.0123456789abcdef \
--discovery-token-ca-cert-hash sha256:xxxxxxxxxx4d55338xxxx2e4exxxxx5b77d1xxxx476e7f4163dcxxxxxxxd7xxx \
--cri-socket=unix:///run/containerd/containerd.sock- 查看集群
root@k8s-master01:~/.kube# kubectl get no -A -owide
NAME           STATUS   ROLES           AGE     VERSION   INTERNAL-IP       EXTERNAL-IP   OS-IMAGE             KERNEL-VERSION       CONTAINER-RUNTIME
k8s-master01   Ready    control-plane   28m     v1.33.0   192.168.202.129   <none>        Ubuntu 22.04.5 LTS   5.15.0-156-generic   containerd://1.7.28
k8s-slave01    Ready    <none>          5m45s   v1.33.0   192.168.202.132   <none>        Ubuntu 22.04.5 LTS   5.15.0-156-generic   containerd://1.7.28
k8s-slave02    Ready    <none>          4m13s   v1.33.0   192.168.202.135   <none>        Ubuntu 22.04.5 LTS   5.15.0-156-generic   containerd://1.7.28
k8s-slave03    Ready    <none>          4m7s    v1.33.0   192.168.202.136   <none>        Ubuntu 22.04.5 LTS   5.15.0-156-generic   containerd://1.7.28
6. 安装calico插件
操作节点:只在master节点(k8s-master)执行
从官网下载部署文件:
https://raw.githubusercontent.com/projectcalico/calico/v3.30.3/manifests/calico.yaml
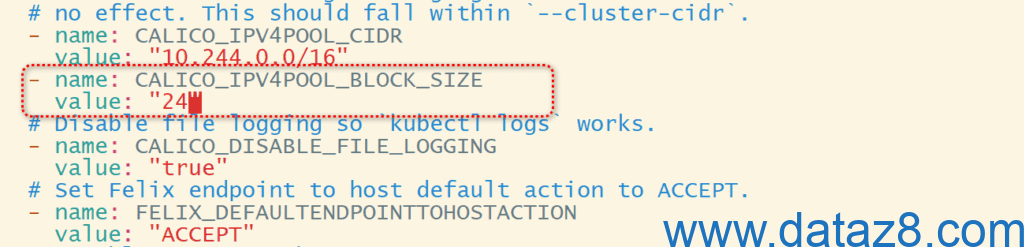
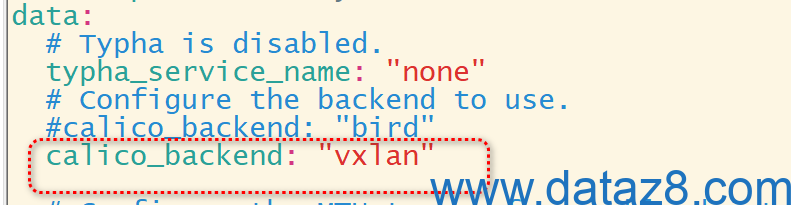
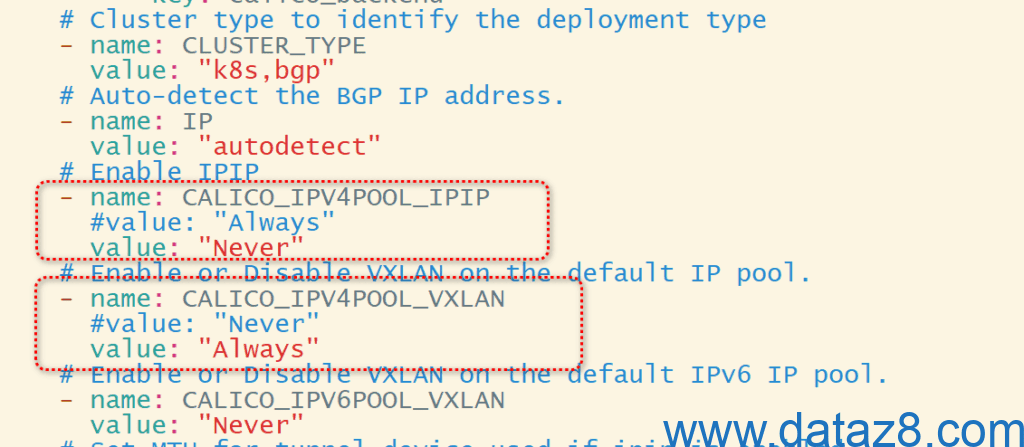
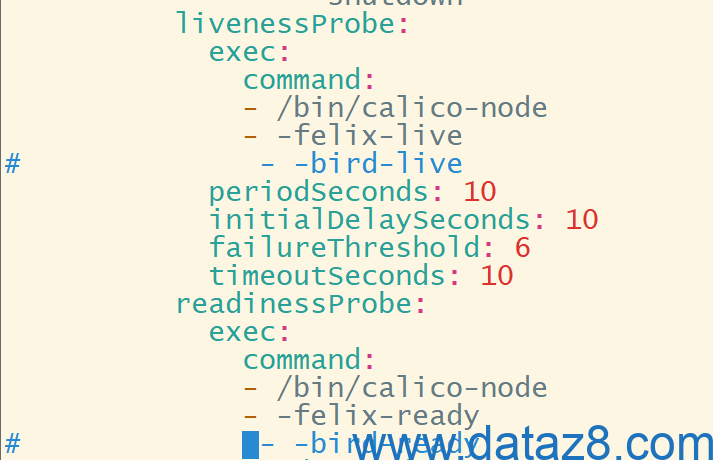
curl https://raw.githubusercontent.com/projectcalico/calico/v3.30.3/manifests/calico.yaml -O修改部署文件以适配k8s集群环境

root@k8s-master01:/usr/local/mysoft# kubectl apply -f calico.yaml
poddisruptionbudget.policy/calico-kube-controllers created
serviceaccount/calico-kube-controllers created
serviceaccount/calico-node created
serviceaccount/calico-cni-plugin created
configmap/calico-config created
customresourcedefinition.apiextensions.k8s.io/bgpconfigurations.crd.projectcalico.org created
customresourcedefinition.apiextensions.k8s.io/bgpfilters.crd.projectcalico.org created
customresourcedefinition.apiextensions.k8s.io/bgppeers.crd.projectcalico.org created
customresourcedefinition.apiextensions.k8s.io/blockaffinities.crd.projectcalico.org created
customresourcedefinition.apiextensions.k8s.io/caliconodestatuses.crd.projectcalico.org created
customresourcedefinition.apiextensions.k8s.io/clusterinformations.crd.projectcalico.org created
customresourcedefinition.apiextensions.k8s.io/felixconfigurations.crd.projectcalico.org created
customresourcedefinition.apiextensions.k8s.io/globalnetworkpolicies.crd.projectcalico.org created
customresourcedefinition.apiextensions.k8s.io/globalnetworksets.crd.projectcalico.org created
customresourcedefinition.apiextensions.k8s.io/hostendpoints.crd.projectcalico.org created
customresourcedefinition.apiextensions.k8s.io/ipamblocks.crd.projectcalico.org created
customresourcedefinition.apiextensions.k8s.io/ipamconfigs.crd.projectcalico.org created
customresourcedefinition.apiextensions.k8s.io/ipamhandles.crd.projectcalico.org created
customresourcedefinition.apiextensions.k8s.io/ippools.crd.projectcalico.org created
customresourcedefinition.apiextensions.k8s.io/ipreservations.crd.projectcalico.org created
customresourcedefinition.apiextensions.k8s.io/kubecontrollersconfigurations.crd.projectcalico.org created
customresourcedefinition.apiextensions.k8s.io/networkpolicies.crd.projectcalico.org created
customresourcedefinition.apiextensions.k8s.io/networksets.crd.projectcalico.org created
customresourcedefinition.apiextensions.k8s.io/stagedglobalnetworkpolicies.crd.projectcalico.org created
customresourcedefinition.apiextensions.k8s.io/stagedkubernetesnetworkpolicies.crd.projectcalico.org created
customresourcedefinition.apiextensions.k8s.io/stagednetworkpolicies.crd.projectcalico.org created
customresourcedefinition.apiextensions.k8s.io/tiers.crd.projectcalico.org created
customresourcedefinition.apiextensions.k8s.io/adminnetworkpolicies.policy.networking.k8s.io created
customresourcedefinition.apiextensions.k8s.io/baselineadminnetworkpolicies.policy.networking.k8s.io created
clusterrole.rbac.authorization.k8s.io/calico-kube-controllers created
clusterrole.rbac.authorization.k8s.io/calico-node created
clusterrole.rbac.authorization.k8s.io/calico-cni-plugin created
clusterrole.rbac.authorization.k8s.io/calico-tier-getter created
clusterrolebinding.rbac.authorization.k8s.io/calico-kube-controllers created
clusterrolebinding.rbac.authorization.k8s.io/calico-node created
clusterrolebinding.rbac.authorization.k8s.io/calico-cni-plugin created
clusterrolebinding.rbac.authorization.k8s.io/calico-tier-getter created
daemonset.apps/calico-node created
deployment.apps/calico-kube-controllers created

root@k8s-master01:/usr/local/mysoft# kubectl get po -A -owide |grep calico
kube-system   calico-kube-controllers-7cddcf748-fqz2x   1/1     Running   0               40s   10.244.0.3        k8s-slave03    <none>           <none>
kube-system   calico-node-gstrt                         1/1     Running   0               40s   192.168.202.129   k8s-master01   <none>           <none>
kube-system   calico-node-lj99x                         1/1     Running   0               40s   192.168.202.136   k8s-slave03    <none>           <none>
kube-system   calico-node-pptk4                         1/1     Running   0               40s   192.168.202.132   k8s-slave01    <none>           <none>
kube-system   calico-node-rw7tb                         1/1     Running   0               40s   192.168.202.135   k8s-slave02    <none>           <none>
7. 验证集群
操作节点: 在master节点(k8s-master01)执行
root@k8s-master01:~#  kubectl get nodes   #观察集群节点是否全部Ready
NAME           STATUS   ROLES           AGE   VERSION
k8s-master01   Ready    control-plane   24h   v1.33.0
k8s-slave01    Ready    <none>          24h   v1.33.0
k8s-slave02    Ready    <none>          24h   v1.33.0
k8s-slave03    Ready    <none>          24h   v1.33.0
8. 创建测试nginx服务
root@k8s-master01:~# kubectl run  test-nginx --image=swr.cn-north-4.myhuaweicloud.com/ddn-k8s/docker.io/library/nginx:alpine
pod/test-nginx created

root@k8s-master01:~# kubectl get po -o wide
NAME         READY   STATUS    RESTARTS   AGE   IP             NODE          NOMINATED NODE   READINESS GATES
test-nginx   1/1     Running   0          19s   10.244.244.2   k8s-slave02   <none>           <none>
root@k8s-master01:~# curl 10.244.244.2
<!DOCTYPE html>
<html>
<head>
<title>Welcome to nginx!</title>
<style>
html { color-scheme: light dark; }
body { width: 35em; margin: 0 auto;
font-family: Tahoma, Verdana, Arial, sans-serif; }
</style>
</head>
<body>
<h1>Welcome to nginx!</h1>
<p>If you see this page, the nginx web server is successfully installed and
working. Further configuration is required.</p>

<p>For online documentation and support please refer to
<a href="http://nginx.org/">nginx.org</a>.<br/>
Commercial support is available at
<a href="http://nginx.com/">nginx.com</a>.</p>

<p><em>Thank you for using nginx.</em></p>
</body>
</html>
至此,整个集群搭建完毕,服务可访问。